Eevee NPR shaders
__________________________________
Documentation
Announcement
With Wasili's blessing, I was able to publish a proposal on Right-Click-Select to get a full on NPR shader for 2.8.
To keep it trending and keep it on top, go vote it up, share, etc.
See the get involved section below too.
See the get involved section below too.
NPR
NPR (Non-Photo-realistic Rendering)
is not currently officially supported in the new render engine set to
form the basis of the new viewport in 2.8. With this limitation, Wasili
Novratidis and I worked extremely hard to put together a set of NPR
shaders that would give you a lot of the options you have and expect to
have in Blender Render.
These were built out of nodes and are not coded into Blender and this means that there are a few limitations on how they work.
At the moment these are the shaders that are supported:
Old Shaders
- Blinn Sun Lamp
- Blinn Point Lamp
- Phong Sun Lamp
- Phong Point Lamp
- Anisotropic Sun Lamp
- Anisotropic Point Lamp
Each of these are a separate setup, because their math varies greatly.
They are really easy to add and easy to setup, so let's get started!
Experimental shaders
- Toon Diffuse (Based on Diffuse BSDF)
- Toon Specular (Based on Glossy BSDF)
Importing a shader
To add the old shaders:
- Append all objects (except the camera)
This will add the empties and lamp required for the shader to work and
it will also add a Suzanne with the shader on. You can simply remove
the suzanne (for blinn and phong) and assign the material to whatever
object you wish.
For Anisotropic-style shaders, there is a
parented empty that needs a new parent when moving the material. This is
a per object shader if you want individual control of the empty.
To add the experimental toon shaders:
- Append node groups (Toon Diffuse and Toon Specular)
This will add the shaders themselves and allows you to add a new
material and simply add these from Shift+A > Groups. Wire them up
like you would normal diffuse and specular shaders and adjust to your
heart's content.
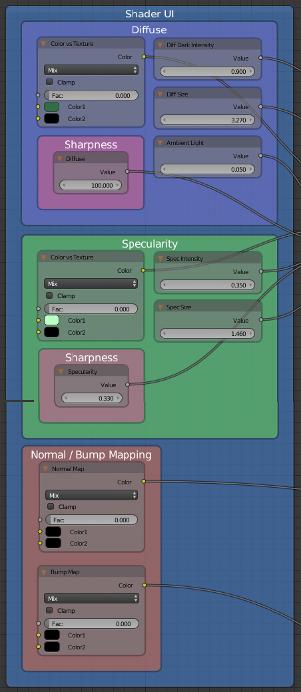
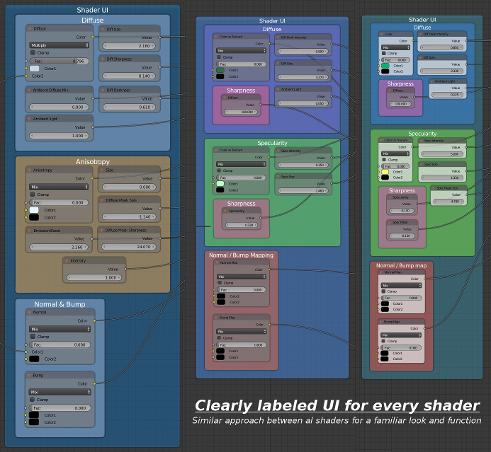
General Eevee Toon Shader UI
Shader Features
_____________________________________________
_____________________________________________
Diffuse
Colour vs Texture (Textureable inputs)
Typically, most shaders allow you to texture the diffuse and this one is no different. The advantage of using a mix node for this input atm is that you can fade it out over time.
Diff Dark Intensity
The diffuse's shading (excluding lamp shadows) is calculated and then multiplied over the Colour Vs Texture input. This controls how dark tha shaded part of the diffuse will be.
Diff Sharpness (Upgraded)
Like it says, adjusts the sharpness. It used to be extremely sensitive, but the sensitivity has been greatfuly reduced for those initial soft settings to give you more control with less hassle. This applies to all the sharpness settings in the shaders.
Diff Size
Controls the size of the diffuse shading
Ambient Light
Controls the brightness of the overall material. Like Emit in Blender Render.
An emission shader was added to brighten up the material like environment lighting. This is coloured using the calculated diffuse or the Colour vs Texture input (depending on light source).
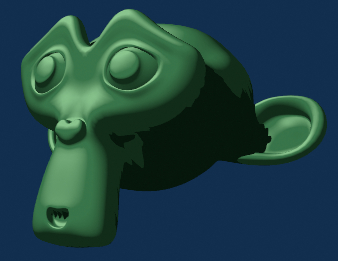
Shader example
Quick overview and Moses example in the Vlog for Exodus 7-12,KJV, 2018 - 01 - 11
Specularity
Colour vs Texture (Textureable inputs)
A uniqueness we remember from Blender render is the ability to also texture specularity and we have it again in this shader.
Spec Intensity
This controls how bright the specularity is.
Spec Sharpness (Upgraded)
Like with the diffuse, sharpness controls have been added for specularity as well as the diffuse mask over the specularity. Still need a very high value for crispness.
Spec Size
Manages the size of the specularity
Normal/Bump mapping
Normal Map
An input for a Normal Map. In order to use this feature effectively, you need to add it to the first input of the mix node, because the factor is by default set for that. To decrease the strength, just use the factor as a strength tool.
Bump Map
An input for a Bump Map. In order to use this feature effectively, you need to add it to the first input of the mix node, because the factor is by default set for that. To decrease the strength, just use the factor as a strength tool.
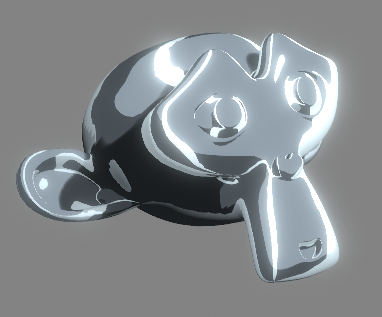
Anisotropic-style shaders
Fairly
obvious what this is by the image, but it's all about that brushed
steel look. I luv how this shader looks. Do realize that this is not physically accurate by any stretch of the imagination. The actual equation will be far too slow in nodes, unless coded.
Plus, with these you can have it real looking or tooned!
Diffuse
Colour vs Texture (Textureable inputs)
Typically, most shaders allow you to texture the diffuse and this one is no different. The advantage of using a mix node for this input atm is that you can fade it out over time.
Diff Dark Intensity
The diffuse's shading (excluding lamp shadows) is calculated and then multiplied over the Colour Vs Texture input. This controls how dark tha shaded part of the diffuse will be.
Diff Sharpness
Like it says, adjusts the sharpness. Main difference happens between 0 and 1, but you need roughly 100+ for perfectly crisp shading. Includes new sensitivity fix!
Diff Size
Controls the size of the diffuse shading
Ambient Light
Controls the brightness of the overall material. Like Emit in Blender Render.
An emission shader was added to brighten up the material like environment lighting. This is coloured using the calculated diffuse or the Colour vs Texture input (depending on light source).
Ambient Diffuse Mix
Controls a masked area of diffuse and ambient light. It creates a partial area boost for higher contrast).
Anisotropy
Colour vs Texture (Textureable inputs)
Usually defined by the surface, this allows you to color or add textures that partially brightens, colors or masks the anisotropy.
Diffuse mask size
The same as with the Phong model, this prevents brightness where it shouldn't be.
Diffuse Mask Sharpness (Upgraded)
Defines the sharpness of the diffuse mask, allowing, for example, a soft fade on an otherwise sharp toon/cell shader.
Anisotropic sharpness (NEW + Upgraded)
Replaces the second ColorRamp with the existing math from V2's other sharpness settings. Ideal for switching between a more PBR-like style and a really harsh toon shaded style. Also includes the new sensitivity fix!
Emission boost
A literal brightness boost that is added with the emission shader (this is a post-masking anisotropic only boost, to prevent it looking like a lamp).
Intensity
The overall brightness of the anisotropic highlights
Normal/Bump mapping
Normal Map
An input for a Normal Map. In order to use this feature effectively, you need to add it to the first input of the mix node, because the factor is by default set for that. To decrease the strength, just use the factor as a strength tool.
Bump Map
An input for a Bump Map. In order to use this feature effectively, you need to add it to the first input of the mix node, because the factor is by default set for that. To decrease the strength, just use the factor as a strength tool.
Anisotropic-style shader
Experimental Shaders
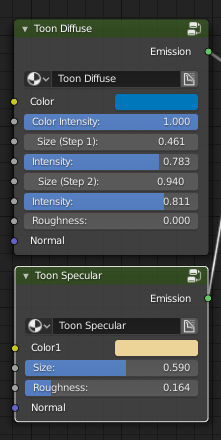
Diffuse
Color
A basic color/texture plugin. Do note that because this node uses HSV as it's basis, grayscale textures will not show up.
Color Intensity
This just determines the brightness of the color (very similar to the intensity control in Blender Render).
Size (Step 1)
I added two step shading to this shader to enable a bit fancier
shading. This was never light responsive in Blender Render, but is in
Eevee. Two step diffuse lighting.
Intensity
How dark step 1 is (multiplied over the color input).
Size (Step 2)
Second step of diffuse lighting.
Intensity
How dark step 1 is (multiplied over the color input and step 1).
Roughness
I honestly don't think this makes any difference, but you be the
judge. It connects to the roughness input of the diffuse BSDF node that
this is based on.
Normal
Of course every material has to have normal influence and this also plugs into the diffuse node's normal input.
UPDATED: Now supports Sharpness as well.
Here is a bit more info:
DEMOS
Get Involved
Of course a feature set like these shaders is not just for a handful of people and does not contradict what we already have - they can exist in harmony for the simple reason that a computer simply does what it is told - PBR environment or not.
We need help from the community to get this into Blender. Wasili has taken it upon himself to learn how to code and he is doing a magnificent job of it, but it will take him a while to get to the level where he needs to be to get this done as well as other features we need for 2.8.
If you:
- Can build shaders with nodes
- Can code
- Know Blender
- And enjoy any form of NPR
You qualify!
We are asking you to help us by coding an NPR shader for 2.8. We specifically licensed these shaders as CC0 to prevent people from going for it, but as an official statement of permission, you have permission to code this - we're just asking for the same courtesy.
It really needs to be free and accessible to the whole blender community.
So, because you are interested in taking this on, here are links that will help you get what you need to help us finish this difficult chapter in NPR history:
The proposal:
Developer Info:
Thank you for getting involved!
Send us links to your progress and submissions! We'd luv to see how it's going!
Thank You!
A big thanx to everyone in the NPR community (especially those on FB) who have been so supportive of these shaders and have tried them! It is truly an honor for myself and Wasili to be able to share these!
A specific thanx has to go to Sage Light Bwk who suggested a math based solution for solving the sensitivity problem and to Pua Kai who suggested a ColorRamp. GOD helped me merge their suggestions and we now have a much less sensitive, yet very functional shift with no popping!
"For of Him, and through Him, and to Him,
are all things: to Whom be glory for ever. Amen."
Romans 11:36, KJV

Current limitations
Most shaders
- Sometimes quite broken out of camera view (works in-camera)
- Anisotropy is very inaccurate
- Single light source on import (due to having to manually track the light source using drivers). More lights can be added.
- Appending required to add the shader and its components the first time (per project - not per object)
-
As time passes the diffuse can darken on the anisotropic shader - issue
in 2.8, not the shaders. There are no timers built in anywhere.
- Sun lamp fades out on material based on horizon (still looking into solutions for this)
Experimental shaders
-
Some small issues still remain, like the inability to produce a
grayscale texture directly. To make a grayscale result or texture work
with this shader, you have to add it using various colors and turn it
black and white with a Shader to RGB node. The reason for this is
because black and white determines brightness and the shader breaks up
HSV with a static V beyond certain limits.
-
You can achieve variations of smoothness, but this breaks your size
controls, because you have to manually adjust size and hardness based on
a colorramp inside the node group.